How to Make a Garden Plan

 What’s your plan for your garden this year? Maybe you have an idea of some new veggies that you would like to plant, and you may have a general idea about when to plant things, but putting a bit of thought into the nitty gritty details of your garden now will pay off later in the season. Here are some things we like to keep in mind while planning our gardens. 

Careful planning is essential for maximizing space and for a tidy garden!

Careful planning is essential for maximizing space and for a tidy garden!

What did you plant last year?

Plant what did well and think back to what didn’t do well - do you know why it didn’t thrive? Is there another place in your garden where that crop would do better (that may be sunnier, more moist, less accessible to deer, etc.)?

You also want to consider what you planted and where so that you can rotate your crops. Crop rotation can contribute to healthier soil and lower pest pressure. Some crops are heavier feeders while others replenish nutrients. For example; following heavy feeders like broccoli with nitrogen fixers like beans can replenish some of the soil’s lost nutrients. Additionally, some pests can overwinter in the soil and will continue to be a problem year after year if the pest’s host plant is kept in the same place. Cycling your crops through different beds to ensure that the same family isn’t in the same place twice may help disrupt the pest cycle. 

What pest/disease problems did you experience last year?

If you experienced a swarm of cabbage worms last year, taking a season off of Brassicas (their host plant) may effectively drive them away in time for a Fall planting. Focus on other families like amaranthaceae (which includes beets, spinach, and swiss chard) or Apiaceae (which includes, cilantro, parsley, and celery).

What are the conditions of all of your beds/containers/planters?

As you rotate your crops, keep in mind the conditions where you’ll be planting! Different beds may have different sun exposure, weeds, moisture levels, and pests. Even if you have a container garden, different pot materials may affect soil moisture, shape may affect soil depth, and placement may affect sunlight. Make sure you know which conditions are ideal or acceptable for each of your crop varieties. 

Garden planning helps you estimate quantities of needed seeds and seedlings, maximizes the garden’s yield, and makes for a tidier garden.

Garden planning helps you estimate quantities of needed seeds and seedlings, maximizes the garden’s yield, and makes for a tidier garden.

Spacing

Planning ahead of time can help you determine the number of plants that can actually fit in your garden. This not only helps you purchase the correct amount of seeds and seedlings but helps you stay conscious of spacing. 

It can be tempting to plant as many veggies as fit into your garden - the more the merrier, right? Not always… Compact plantings can decrease necessary airflow between leaves which can lead to a myriad of diseases and pests. To many plants in one space also means competition for space, sunlight, and nutrients. You can find proper spacing information on the back of most seed packets. 

Timing and Succession Planting

Similar to spacing, it can be tempting to plant all of your seeds at the same time, as early as possible. Timing is important - temperature affects seed germination and plant health. Including timing in your garden plan will remind you of proper timing and ensure your veggies have the best chance of being healthy and productive. 

Taking both timing and spacing into account - it can help to plan for multiple successions of a crop by leaving room and noting a second sowing date. Planting a crop every two or so weeks within the appropriate window (“Succession planting”) can safeguard your crops against pests and diseases and extend the harvest. Maybe your first round of lettuce gets eaten by early season slugs - you still have a second crop to lean on! The slightly later planting may be late enough for the slugs to be driven away by the heat. And if each succession thrives, you’ll have a well-distributed harvest rather than having 15 head lettuces all at once. 

Garden plans.png

How can you keep all of this information straight?

We like to use excel so we can easily see how the gardens will progress through-out the seasons and can make edits when unexpected changes occur. Making a low-tech garden map for each season can work just as well!

Need help putting together a garden plan? Contact us at info@edibleedenfoodscapes.com

Intro to IPM, Part 1

Bugs. They’re inevitable in a garden, so what do we do about them?

In our gardens, we aim to do the least harm to ecosystems while producing beautiful, plentiful produce for our clients. Because we want to support beneficial insects and pollinators while minimizing pests, no one-size-fits-all pest-management tactic will work for us. We look to IPM (Integrated Pest Management) to balance and treat pest pressure in our gardens. 

What is Integrated Pest Management? 

IPM is a set of principles that inform ecological-based long-term pest treatment that minimizes harm to humans, water, non-targeted organisms, and the environment. (Here, a pest is considered anything that may cause harm to your plants - insects, disease, or poor conditions.)

IPM lays out a series of steps to follow continuously, even before you notice a problem:

The key to treating hornworms is catching them early. Regular inspection is key!

The key to treating hornworms is catching them early. Regular inspection is key!

Step 1: Inspection

At least once a week, walk around your garden and observe it closely. Look at the soil, the undersides of leaves, the joints of your plants. Do you notice any holes in the leaves? Any spotting, yellowing, or browning? Do you see any insects? Frass? Eggs?

Step 2: Identify

Identify what those symptoms or insects are. Are the spots on your leaves yellow, brown, white, or black? What is that insect? What are the eggs on the underside of your squash leaves? Insects can be especially hard to identify - many look very different in their nymph stage from their adult stage. Try to learn how to ID each step of their maturation.

Step 3: Inform

Once you’ve properly identified a pest, learn about its life-cycle and biology. What can they eat? What attracts them? Do they lay their eggs in the soil or on the plant? Are they pests during their whole life cycle or just when they are nymphs? At what stage of their life-cycle is treatment effective

Stay tuned for steps 4, 5, and 6 of IPM: determining tolerance, action, and evaluation!

Would you recognize this as a ladybug larva?

Would you recognize this as a ladybug larva?

Lady bugs are an extremely beneficial insects - they happily eat all the aphids in your garden.

Lady bugs are an extremely beneficial insects - they happily eat all the aphids in your garden.

Insects like this Swallowtail Caterpillar may seem like a pest at first - they eat parsley, dill, and fennel. But if you let them pupate, they’ll reward you as beautiful and beneficial pollinators.

Insects like this Swallowtail Caterpillar may seem like a pest at first - they eat parsley, dill, and fennel. But if you let them pupate, they’ll reward you as beautiful and beneficial pollinators.

Garden Herb Shortbread Cookies

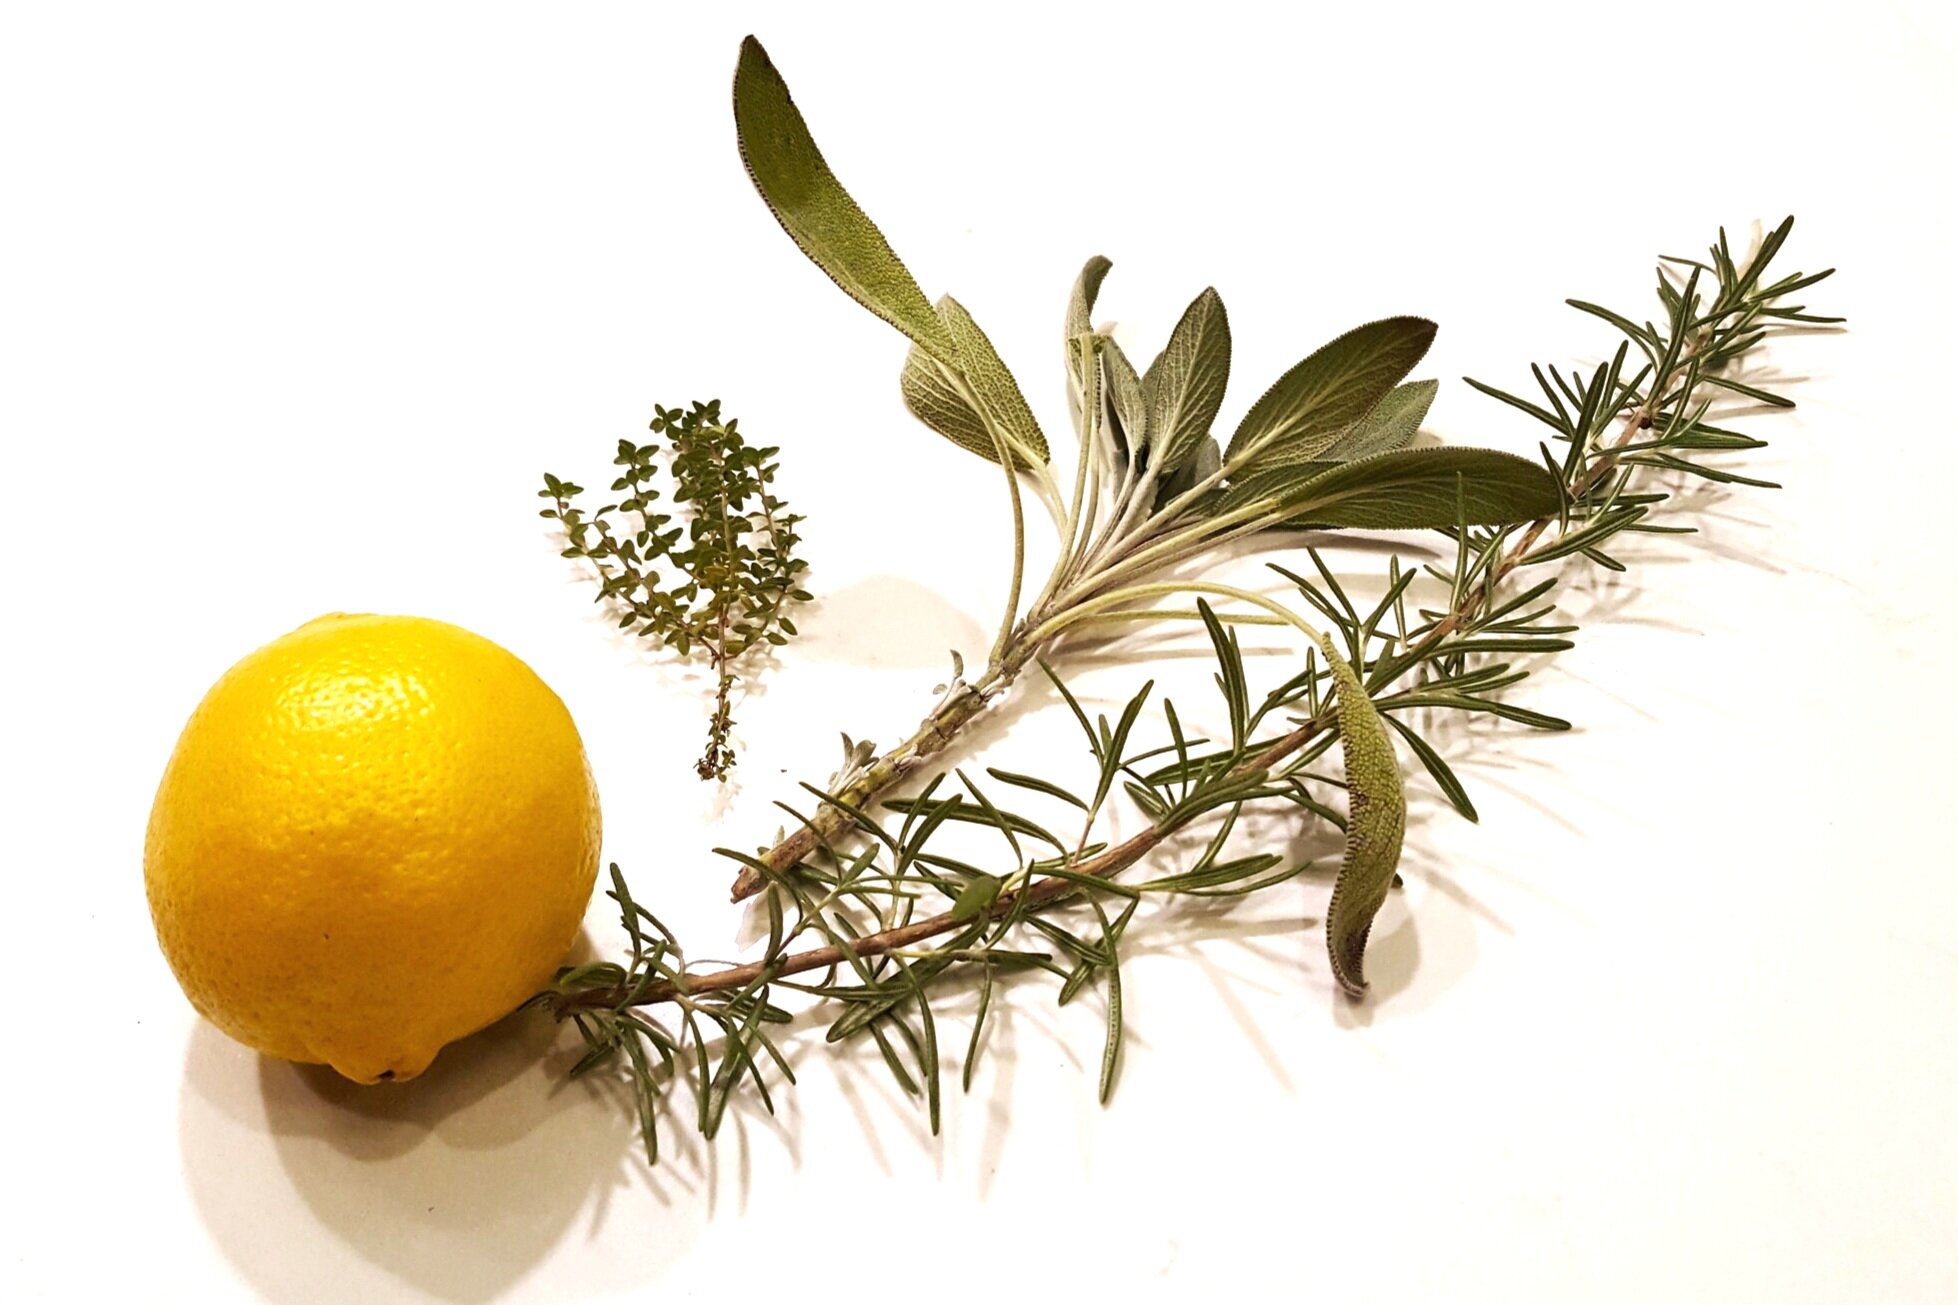
lemon+and+herbs2.jpg

Want to stand out at this year’s cookie exchange? Longing for the flavors of your garden? Pull those dried herbs out to add a twist to a classic shortbread cookie for a simple but unexpected recipe. This is the perfect treat to enjoy with some hot herbal tea on a cold winter day while dreaming of the summer garden....

Some possible flavors: thyme, lemon-thyme, lavender, rosemary, sage, tarragon, anise-hyssop 

Add these on their own or in combinations with one another or with lemon, lime, or orange zest


Ingredients

  • 1/2 cup (1 stick) unsalted butter, softened at room temperature

  • 1/4 cup powdered sugar

  • 1/2 teaspoon vanilla extract (optional)

  • 1 cup all purpose flour

  • Generous pinch of coarse kosher salt

  • 1 tablespoon of finely chopped herb of choice 

  • 1 tablespoon of citrus zest of choice (optional)


Directions

  • Cream butter and powdered sugar until smooth

  • Beat in any citrus zest, chopped herbs, and vanilla extract as desired

  • Mix in flour and salt until just combined

  • Transfer dough to a large piece of plastic wrap, roll out into a disk, cover with a second sheet of plastic wrap and continue to roll out to 1/4th inch thick disk. Chill for 20-30 minutes.

  • Preheat oven to 350

  • After chilling, cut dough into desired shapes with knife or floured cookie cutter

  • Place on parchment lined baking sheet and bake for 15 minutes or until golden brown

Curing and Storing Vegetables

garlic_curing_storage.jpg

As we enter the cold Winter months and our gardens are put to bed for the season, we start pulling preserved food from our pantry; canned fruits, pickled veggies, and dried herbs. 

While some types of produce will store well (like onions, garlic, and winter squash) did you know that even these vegetables must go through a preservation process called “curing” in order for them to last into the winter? 

Vegetable curing isn’t quite like meat or cheese curing - no salt or smoke is involved. But it is similar insofar as it dries out the outer skin of the vegetable to make it shelf stable for a longer time than if it were stored fresh out of the ground. Not all veggies can be cured, but below we’ll outline the curing and storing process for some favorites that are commonly found in our gardens. 

Garlic

Harvest: When the leaves are beginning to turn brown (typically the beginning of July in Maryland). Mature heads should fill out their skin. Dig one up as a test if you aren’t sure.

Curing: Brush (don’t wash!) off any large clumps of soil. Hang garlic by the stem or lay it out in a warm (70-80 degree F), well-ventilated place out of direct sunlight for at least 2 weeks or until the stalk is hard and dry. 

Storage: At this point you can trim off the stalk or keep it on. (Braiding and hanging soft-necked garlic is an effective and beautiful storage option!) Store cured garlic in a dark, cool, and well ventilated place. Cured soft-neck garlic can be stored for 6-8 months while hard-necked garlic will keep for 2-4 months.


Onions

Harvest: When stalks begin to turn brown and die back. Usually, the shoulders of the onion bulb will pop out of the soil and give you an idea of their size and maturity.

Curing: Leave the stems and roots on and brush (don’t wash!) off any large clumps of soil. Lay or hang the onions out in a warm, well-ventilated place away from direct sunlight for at least 2 weeks or until the outer skins have become dry and papery. Trim back the tops and check to see if there is any green - if so, continue to dry.

Storage: Store cured onions in a dark, cool, and well ventilated place. Storage times will differ with variety, but some onions can store for up to 6 months. 

Potatoes

Harvest: Once their greens die all the way back. Some sources recommend allowing them to stay in the ground for a week or two more to allow the skins to begin to harden underground. The skins of mature potatoes should not be able to be rubbed off easily.

Curing: After you harvest the potatoes, brush (don’t wash!) off any large clumps of soil and lay out to dry in a cool (50-60 degrees F), dark, well-ventilated place for 2-3 weeks.

Storage: Store in a dark, cool, and well ventilated place - covered baskets or closed boxes are good options for containers that will provide airflow but stay dark. 


Sweet Potatoes

Harvest: As early as when the leaves at the end of the vines have begun to yellow or as late as when the vine turns brown.  

Curing: Lay out in a warm (85 degrees or more) and preferably humid place for a week or two. Wounds should heal and skins should harden when fully cured. 

Storage: Once cured, store at room temperature. Cured sweet potatoes can keep for 4-6 months.

Winter Squash

Harvest: Before frost but after most of the foliage has died back. Skins should be beginning to harden and stalks beginning to dry. Harvest by cutting the squash off the vine leaving at least an inch of stem attached to the fruit. 

Curing: Lay out in a warm (70-80 degree) and well-ventilated place for 2 weeks. Squash can be sun cured in the field (depending on the weather and time of year) or in a sunroom as well.

Storage: In a cool place with good ventilation. Cured Winter Squash can keep for 3-6 months.


Curing vegetables may seem like something only an old timey root cellar can accomplish, but it’s easier than you think to find or make the right environment for each of these veggies in your own home. For cool, dark places - check out your basement, attic, or even an unused cabinet or closet. For warm places consider a sunroom, a sunny window, or just leaving the veggies out in the garden. (But check the weather for rain or temperature drops first!) Storing your cured veggies in containers like crates, baskets, mesh bags, or laid out on a shelf can encourage the necessary airflow.

Have questions? Run into problems? Celebrating curing successes? Let us know how it went!


Our Guide to Vermicomposting

Red Wiggler Composting Worms, photo from http://working-worms.com/how-to-make-your-own-worm-farm/

Red Wiggler Composting Worms, photo from http://working-worms.com/how-to-make-your-own-worm-farm/

People often ask us the best way to compost food scraps in a home environment. While tumbler systems and three bay pallet systems have some benefits, we almost always recommend families start with a worm system!

Worm composting, or vermicomposting, is the fastest form of composting one can attempt at home requiring around 6 months to convert food scraps into ready-to-use black gold compost. Vermicompost is different from other forms of composting because, rather than using bacteria and the heat they produce to break down food scraps, it primarily relies on worms’ digestive system! While the compost that comes out of a tumbler is often chunky and only partially decomposed, a worm bin yields crumbly, friable, ready-to-use fertilizer that doesn't smell bad.

But not all worms are equal! Red Wiggler worms, not earthworms, are used for composting. In ideal conditions, they can eat up to ½ of their body weight in a day! Other characteristics of these worms (the fact that they don’t dig very deep, their aversion to light) are also put to use in most vermicomposting systems. 

No matter the system, what goes in it will be the same. Worms require food scraps, of course. Like most compost systems, you’ll want to avoid dairy, meat, or anything that’s been cooked with oil or fat. But worms also don’t like anything that is particularly pungent like hot peppers, citrus, and onions. They love coffee grounds, apple cores, banana peels and they will actually mate in eggshells.

In addition to food scraps, you’ll need to add “bedding.” Bedding can be anything from leaves, to coconut coir, to shredded paper and cardboard. Bedding adds carbon to the compost, but it also provides the worms with an ideal environment. There should be a 1-2 inch layer of bedding on top of any food scraps to give the worms cover from light and to trap in the right amount of moisture. Bedding should be damp but not wet - if you pick up a handful it shouldn’t drip, but you should be able to squeeze out a few drops of moisture.

Types of Vermicomposting Systems:

A worm bin made from Tupperware containers, photo from https://www.canr.msu.edu/news/worm_composting_or_vermicomposting

A worm bin made from Tupperware containers, photo from https://www.canr.msu.edu/news/worm_composting_or_vermicomposting

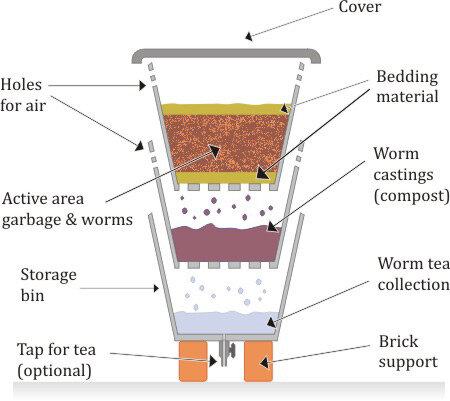
The simplest and cheapest system can be made out of two large tupperware bins. Drill small holes in the bottom and larger hole in the sides and top of one container. Place bricks in each corner of the other - this will be the base. Place the bin with holes inside of the base bin and on top of the bricks so that it’s “floating” by a few inches. Add worms and bedding in the bin with holes. The holes in the bottom allow for excess moisture to drain into the base bin while the holes in the tops and sides allow for airflow. An upgraded system will also include a spigot in the bottom bin to drain out the ‘worm tea’ and a third bin on top to allow for upward migration. 


Pros:

  • Relatively inexpensive and easy to diy

  • The large bins can create a decent amount of compost

Cons:

  • Bulky

  • Involved and messier harvest process


Upward Migration System, photo from http://working-worms.com/how-to-make-your-own-worm-farm/

The most common vermicomposting system for households is an upward migration system, also called a “worm hotel.” These systems are composed of at least three trays with mesh bottoms. They stack on top of one another allowing for the worms to crawl freely between them. Start with one tray and as it fills up you add another tray and another until they are all full. The worms will crawl up towards the surface and towards new food as they finish the food in the bottom tray. By the time all of the trays are filled, the bottom tray should be ready to harvest. 

Pros:

  • clean, compact, and presentable

  • easy harvest

Cons:

  • More of an Investment

  • Smaller bins mean smaller harvests

Find more info about how to start vermicomposting here!

Want to give vermicomposting a try? Contact us today to source a worm bin and worms or to set up a hands-on worm bin workshop!


A Note From Josh

Josh_ Edible_Eden_Baltimore_Foodscapes

With the last crunchy leaves spiraling down on the frosty winds of December, the soil starting to freeze, and the vegetable crops finished for the season; this is a reflective time for us here at Edible Eden. Winter is our planning time, our business development time as well as some time to breath, evaluate and rest from the growing season.

This past year has been our best to date; we’ve reached new levels of functional design and productivity in creating and stewarding food gardens all over the Baltimore metro area. We’ve generated thousands of lbs of organically cultivated produce, grown our team in order to build our capacity and worked with more knowledgeable and dynamic employees than ever before. We’ve planted hundreds of fruit trees, berry bushes, and native perennial plants around the area and served an ever growing and diverse clientele of wonderful customers.

But this is not just about the success of a small business. 

cone_flower_echinachea_bee_pollinator.jpg

Here at Edible Eden we believe that every square foot we have under our stewardship allows us to make the world a better place. We plant native plants to host native wildlife and strengthen eco-systems. We plant organic veggie gardens to help re-direct food sourcing from the industrial food system. We support our customers in composting and rain water management to ensure we are contributing to healthy soil ecosystems and mitigating harmful runoff. 

It’s not always easy - sometimes this means hand-picking pests, finding hard-to-source materials and a lot of explanation of our services. But the results are worth every moment of hard work. We see our successes reflected in the bio-diversity supported by our gardens, in the joy of seeing our customers taste and enjoy a new local, healthy food; in the pollinators buzzing happily around diverse blooms.

Next year we will continue to enhance our business systems, expand our operations, and hone and improve the products we offered in 2019. 

We know that we wouldn’t be able to do the work that we love without you, our customers and broader community! We want to thank you, sincerely, for being a part of this exciting experiment: Can we, together, vision and work towards a more sustainable, abundant and compassionate human reality?

So here is gratitude for a bountiful growing season, and hopes for a cozy Winter, and a new year full of diversity, deliciousness and joy.


20190904_104130.jpg

Preserving Herbs

A lush lemon-thyme plant, ready for harvest and drying!

A lush lemon-thyme plant, ready for harvest and drying!

Here in Maryland, a commitment to seasonal and local eating includes thinking ahead for Winter. Although some crops like kale, arugula, and collards may be able to extend into the early days of Winter, and others like winter squash and potatoes may store well, very little is accessible during the dark days of February. 

We like to prepare throughout the year by pickling, canning, or freezing any extra produce we can get our hands on. There’s nothing quite like opening a jar of tomatoes in the middle of the Winter and being transported back to your Summer garden. 

While the days of canning may be behind us for the year, it’s not too late to preserve your herbs for some added zest and freshness in winter dishes. Below we will go over a few of our preferred methods for preserving herbs. 

Freezing:

Freezing is ideal for more tender and leafy herbs like basil, cilantro, parsley, and chives but can also work well with herbs like oregano, thyme, and mint. 

You can freeze individual portions in water or oil using ice cube trays. Chop the herb (or herbs) of choice and scoop a spoonful into each well of an ice cube tray. Top with a tablespoon of water or olive oil and freeze. Once frozen, toss the cubes into a container or bag so they don’t get freezer burn. Herbs frozen in water are ideal for adding to stews while herbs frozen in oil are the perfect start to a meal; throw one into a skillet, melt, and proceed to saute up the rest of your meal in that flavorful, herb-infused oil!

Mint, Sage, Lavendar, and Thyme hanging to dry

Mint, Sage, Lavendar, and Thyme hanging to dry

Drying:

Drying works best for woodier herbs like rosemary, sage, thyme, and lavender. While you can go “high tech” and dry your herbs in the oven or a dehydrator we actually think they turn out better (and are lower maintenance and look delightful) when they are left to air dry. All you need is a piece of twine! Tie sprigs or small bunches of your herbs upside down by the stems in an area with good airflow and low light. Leave to dry for 7-10 days or until the leaves are crispy and crunchy. Crunch them up and store them in a jar or keep them whole in a paper lunch bag so they don’t collect dust. 


What are your tricks for preparing flavorful meals and eating locally in the middle of Winter?


Seasonal Recipe: Butternut Squash Soup

Squash Soup 1.jpg

To me, Winter squash is the quintessential Fall ingredient. Pumpkin bread, roasted acorn squash, butternut squash soup - YUM. Here’s a quick and easy squash soup recipe (feel free to try a different Winter squash in place of Butternut) adapted from the New York Times. This recipe is delicious enough to serve as a starter for Thanksgiving but easy enough to make for lunch on a crisp Autumn day. 

*Tip - Don’t forget to roast those squash seeds for a salty, crunchy bonus snack!

Ingredients

  • 1 tablespoon extra-virgin olive oil

  • 1 cup finely chopped shallot

  • 2 cloves garlic, minced

  • 4 cups peeled butternut squash in 2-inch cubes (or 2 squash)

  • 3 cups water

  • 1 cup well-flavored chicken or vegetable stock

  •  Salt and freshly ground black pepper

  • Optional Garnish - grated parmesan, roughly chopped parsley, a dash of vinegar, drizzle of heavy cream, or a dollop of sour cream

Directions

  1. Heat the oil in a heavy four-quart saucepan. Add the shallots, reduce heat to low, and saute slowly until they are tender but not brown. Stir in the garlic.

  2. Add squash and water, cover and simmer until squash is tender, about 40 minutes. Allow the mixture to cool for about 15 minutes, then puree in two batches in a food processor (or use an immersion blender).

  3. Return the puree to the saucepan and add the stock. Cook until soup reaches desired consistency. 

  4. Season to taste with salt and pepper. Serve with your choice of garnish on each portion.

How to Plant Garlic

For thousands of years and across the globe, garlic has been celebrated as a fixture in cuisine, medicine, and even religion! In ancient Rome and China, it was an especially common ingredient among soldiers and laborers as it was considered both a flavor enhancer and a cure for heat exhaustion. In ancient Greece and Egypt it was a common gift to the Gods. As late as World War I, soldiers used garlic’s antiseptic quality to ward off infection. 

French Chef Marcel Boulestin believed garlic to be responsible for so much more. He claimed, "It is not really an exaggeration to say that peace and happiness begin, geographically, where garlic is used in cooking." While we will let you decide for yourself whether garlic is the key to world peace, it is undeniable that garlic has been an important crop in our history. 

How_to_plant_garlic.jpg

Right now, in Maryland and our neighboring states, it is time to get garlic in the ground. Even today planting garlic has a ritualistic feel as it is the last crop we plant before putting the garden to sleep. The garlic will establish roots in the Fall, go dormant in the Winter, and send up a shoot in early Spring. Garlic is a low maintenance crop, only needing attention once during its long growing season - we snap off the garlic scapes (the flower shoots) in early Summer to encourage bulb growth rather than flower growth. (Read more about garlic scapes in our post from June.) Bulbs will be ready for harvest in mid-Summer.

So how do you plant garlic?

  • First, select your variety. There are two main types of garlic:

Hardneck: Good for colder regions as these are the most hardy. They will develop firm stalks that produce scapes. Heads will develop a single row of large cloves. 

Softneck: Ideal for warmer regions as these are less hardy. Soft-neck varieties will not produce scapes. Heads will develop multiple rows of cloves in a variety of sizes. 

  • Whichever you choose, ordering from a nursery or specialty garlic supplier is ideal. Grocery store garlic might sprout, but may not be the best variety for your climate and is often treated to discourage growth. 

  • Separate cloves from one another keeping them in their papery coating. Choose the biggest, healthiest cloves to plant.

  • Identify a planting area with soil that drains well and is full of organic matter (or add a bag of compost before planting). 

  • Plant cloves root side down about four inches apart and two inches deep. Cover garlic bed with a deep layer of straw mulch. 

Need more guidance? Get in touch (as soon as you can!) to schedule a garlic planting in your garden!

Extending the Season

It may seem as though gardening season is nearing its end but with a little extra planning it is possible to keep growing some hearty greens and root crops growing into December. Cold season greens are packed with vitamins and can help you stay healthy through the dark Winter months. Not to mention, many Fall crops will sweeten as the weather turns cold! Farmers extend their growing seasons with high tunnels, low tunnels, and heated greenhouses but even in your own garden you can enjoy a long harvest. Here are a couple ways:

Row cover

Row cover is a fabric, usually made of lightweight polyester or polypropylene, that allows sunlight, water, and airflow in but keeps unwanted factors like insects, excessive sunlight, or frost out. It’s easy to find and not too much harder to work with. You can order it online from most garden/seed suppliers. You can also find metal “hoops” online or fashion some yourself to act as a frame to drape the fabric over without damaging delicate plants. Fabric edges should be secured with staples or rocks to the ground to keep the fabric from blowing away or letting in unwanted bugs or cold temperatures. 

Different weights of fabric are used differently. 

  • The lightest weight fabrics will let in up to 85% of sunlight and are mostly used to keep pests out of veggie beds. 

  • Mid-weight row cover will let in about 75% of sunlight making them a good shade cover for early season greens that you want to grow into the Summer. This weight will also offer some frost protection, but heavier weights can protect crops down to 25 degrees!

  • Heavy weight row cover is ideal for extending the growing season into late Fall and early Spring, as well as providing extra protection for overwintering crops and perennials. This weight provides the most protection against the cold but may limit sunlight to 60% or less. 

To use row cover as a season extender in the Fall it’s best to set it up before the first frost to trap as much warmth in the soil as possible. Once temperature lows are consistently below 25 degrees, the row cover has done its job and it may finally be time to call it quits, although row cover can also be used on early Spring seeds and seedlings to give them a few weeks head start!

Row cover at our St. Paul’s School garden, used here to prevent cabbage loopers

Row cover at our St. Paul’s School garden, used here to prevent cabbage loopers

Pest free Brassicas!

Pest free Brassicas!

Cold Frames

Cold frames are a great, more permanent option for extending your growing season. Cold frames are structures, usually made from a frame with a transparent top and sides, that act as miniature greenhouses. They can be placed over existing beds and can also be used to store plants in containers or to start seedlings in trays. 

Here at Edible Eden we build large cold frames out of treated lumber and polycarbonate. We are currently developing a lighter more economical model that will fit securely over our raised beds. 

Some pros and cons:

  • Cost - cold frames are a substantial investment and prices for generic frames usually begin at $200 a bed. Meanwhile row covers can be purchased online for around $50.

  • Maintenance - While cold frames and row covers both trap heat, cold frames will not allow the same level of airflow as row covers. For this reason, it’s important to monitor the temperature and humidity levels within the frame. Most standard cold frames, including our custom designs, allow for the tops of the frame to open to varying degrees to help control these factors. 

  • Permanence - While a little more effort may be required to monitor your cold frame, its sturdy structure will last much longer than fabric row covers. Row covers, though reusable, usually have to be replaced every two years or so due to wear and tear. 

  • Effectiveness - Row covers will only be effective down to 25 degrees adding about an extra month to your growing season. Cold frames provide more protection from the elements and make it possible to grow all year round. 

A custom cold frame built by Edible Eden

A custom cold frame built by Edible Eden

Top slides open for access and humidity/temperature control

Top slides open for access and humidity/temperature control

Want to give row covers or a cold frame a try this year? Get in touch with Edible Eden to schedule a quick row cover installation or to explore custom cold frame options!

Seasonal Recipe: Squash and Bean Minestrone

The perfect transitional dish from Bon Appetit, this veggie heavy soup is fresh enough for a late Summer night but hearty enough to warm you up on a crisp Fall day. 

Note: the original recipe calls for ham hock and chicken broth. We’re adapting it for our vegetarian friends, but you can find the link to the Bon Appetit version here.


Image and recipe courtesy of bonappetit.com

Image and recipe courtesy of bonappetit.com

INGREDIENTS

  • 1 pound dried navy or cannellini (white kidney) beans

  • ¼ cup plus 2 Tbsp. olive oil plus more for drizzling

  • 1 large onion, finely chopped

  • 2 leeks, white and pale-green parts only, finely chopped

  • 2 small celery stalks, chopped

  • 2 cloves garlic cloves, finely chopped

  • 1 butternut squash, peeled, cut into ½” pieces

  • 1 pound green beans, trimmed, cut into 1” pieces

  • 8 cups vegetable broth

  • 1 pound small pasta (such as tiny shells or pipette)

  • 1 cup chopped fresh flat-leaf parsley, divided

  • 2 bunches flat-leaf spinach, thick stems removed

RECIPE PREPARATION

  • Place navy beans in a large pot; add cold water to cover by 2”. Bring to a boil, reduce heat, and simmer 2 minutes. Remove from heat, cover, and let stand 1 hour.

  • Heat ¼ cup oil in another large heavy pot over medium-low heat. Add onion, leeks, celery, and garlic; season with salt and pepper. Cook, stirring occasionally, until vegetables are softened, about 20 minutes.

  • Add squash, green beans, navy beans (with soaking liquid), and broth, to pot. Bring to a simmer over medium heat; reduce heat to low, cover, and gently simmer until navy beans are tender, 1½–2 hours.

  • When soup is almost finished cooking, cook pasta in a large pot of boiling salted water, stirring occasionally, until al dente. Drain and transfer to a large bowl. Drizzle with 2 Tbsp. oil.

  • Add spinach and parsley to soup. Divide soup into bowls and add pasta.* Enjoy!

*If storing soup, be sure to store pasta and soup separately, always adding pasta just before serving. This will keep the pasta from getting soggy. 


American Persimmons

Photo of American Persimmons courtesy of fast-growing-trees.com

Photo of American Persimmons courtesy of fast-growing-trees.com

Have you ever tasted “the fruit of the Gods?” That’s what Diospyros means, which is the genus name of the fruit more commonly known as a Persimmon. If you’ve tried persimmons before, it’s likely that you ate an Asian variety like the Fuyu or Hachiya, but did you know that there are native American Persimmons, too? In fact, the word “Persimmon” comes from the Algonquin word for the fruit. Early American settlers enjoyed persimmon breads, puddings, and beers, and there are records of this sugary fruit in the journals of John Smith and hungry Civil War soldiers.

Persimmons can be classified into two types: astringent and non-astringent. Astringent persimmons have high levels of tannic acid when they are unripe: one over-eager early bite of an astringent persimmon will have you puckered up and unable to think. The proper time to eat these varieties is when they’ve passed their peak orange color and are starting to turn slightly brown and wrinkly. The flesh of the fruit will be soft, mushy, and sweet. Many cultivated varieties are non-astringent; this means the fruit can be eaten when it is firm, optimizing shipping and storage abilities and providing consumers with a more familiar eating experience. The wild American Persimmons fall into the former astringent camp, so eating them may be messier but so, so worth it.

American Persimmons grow from Florida to Connecticut and as far East as Iowa and Texas. Their fruits have a long and late growing season. While the trees flower in late Spring the fruit won’t be ripe until late Fall at the earliest. Fruit begins to ripen around the end of October but may hang onto the tree even throughout the Winter. 


So what should you do if you stumble on a tree full of persimmons on your next hike (or if you’re lucky enough to have a friend or a farmers market with a reliable supply)? Here is an entire website devoted to traditional American Persimmon Pudding recipes. Tell us which one you liked best!

Garden Pests and Garden Pals: Part 4 - Slugs, Snails and Praying Mantises

As the temperature drops, the insect activity in your garden will decline as well, but you may find a few lingering critters if you look closely!

The beautiful but ever hungry Leopard Slug!

The beautiful but ever hungry Leopard Slug!

This Fall, we’ve noticed a resurgence of slugs and snails in our gardens. These cute and slimy critters love to munch on our leafy greens. 

There are a number of “folk” remedies for garden slugs including sprinkling coffee grounds, eggshells, or sand around your plants, but we’re cautious about what we add to our soils (let us know if you’ve given any of those a try!). It is true that slugs love beer and will happily jump into bowls of beer that they can’t escape, but keeping the bowl full and tidy day after day is sometimes more maintenance than it’s worth! 

As with caterpillars, we think the very best thing to do with slugs and snails is to pick them off by hand and encourage beneficial species (including birds, toads, and praying mantids) to live in your garden and eat these critters as a juicy snack!

Carolina Mantis picture courtesy of extension.umd.edu

Carolina Mantis picture courtesy of extension.umd.edu

You may also see our friend, the praying mantis. Praying Mantises are elongated bugs highly adapted for hunting. They are recognizable by their long torso, triangular head, and name-sake folded front legs. 

While mantis egg sacs are sold in many nurseries and garden catalogues, Mantises are not always the most effective pest-control. Their aggressive nature can make them territorial keeping mantis populations from getting too concentrated. Their diets, though carnivorous, are very general; mantises will eat beneficial insects as well as pests and sometimes members of their own species! 

Still, it’s never a bad thing to see a Praying Mantis and to encourage their presence in your garden. They will catch the hard to catch pests with their advanced hunting techniques and serve as a telltale indicator of a healthy ecosystem. At this point in the season some species can get up to 5 inches long! They will lay eggs in leaf litter which will over-winter and hatch come Spring. 


Pawpaws

Pawpaws are a unique fixture in North American forests - they are North America’s largest native fruit and the only plant in the tropical Annonaceae family that grows natively on the continent. 

Photo courtesy of horticulturetalk.wordpress.com

While most Americans today may be unfamiliar with the Pawpaw, this fruit has its roots in many important moments of American history. A staple of many Native American diets, Pawpaws also fed Lewis and Clark when game was scarce, they were documented as one of George Washington’s favorite desserts, and they were grown by Thomas Jefferson at Monticello.

These rich, custardy fruits found their peak popularity during the Great Depression as a cheap alternative to other sweet, exotic fruits (earning themselves the name “the poor man’s banana”) Their mainstream popularity eventually waned as more exotic fruits were introduced to the US and as more people turned to the grocery store rather than to the land for their food. 

Today, Pawpaws are mostly obscured from the public eye. Stocking Pawpaws in commercial stores is nearly impossible due to their easy to bruise skin and short shelf life. You may have luck finding them at a farmers market or, more likely, along a hiking trail in the “Pawpaw belt,” throughout the East Coast and Midwest. If you are lucky enough to find Pawpaws to enjoy, you’ll soon appreciate their silky smooth, yellow-orange interior and sweet, tangy taste. They’re commonly described as a mix between bananas and mangoes in both flavor and texture. 

In addition to bearing delicious fruit, Pawpaws are an important part of our ecosystem. They are the only host plant of the Zebra Swallowtail butterfly and their fruit feeds many forest mammals. Their tolerance of variable growing conditions (including those tough shady and moist areas) along with their natural pest resistance also makes them an ideal plant to incorporate into your landscape.

Looking for some creative ways to make the most out of Pawpaw season? Why not try Pawpaw pudding, ice cream, bread, or salsa!


And if you want your very own supply of Pawpaws, get in touch with Edible Eden to talk about growing Pawpaw trees in your own backyard!

Seasonal Recipe: Falafel Spice Tomato Flatbread

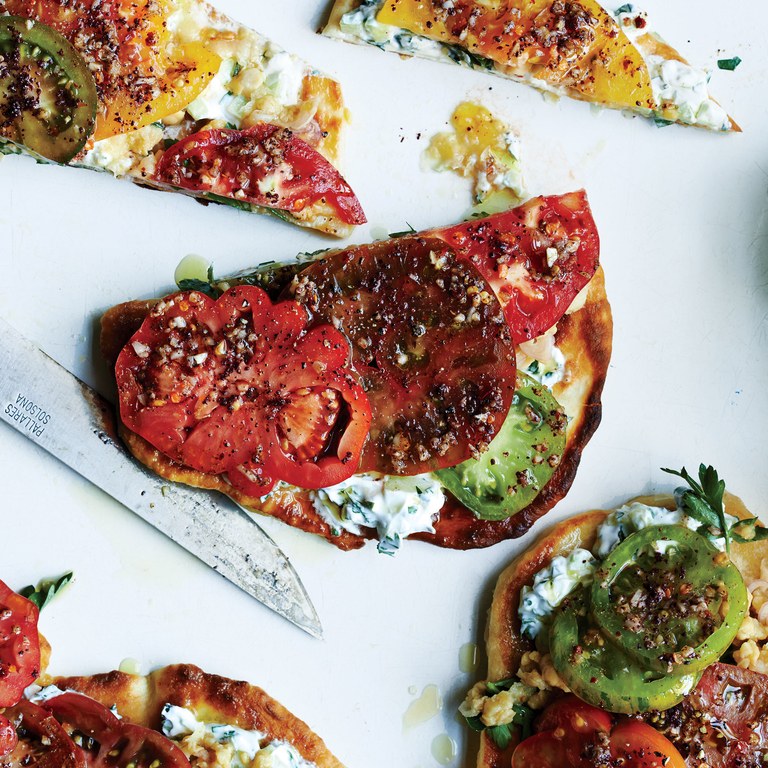
As a final goodbye to vibrant Summer produce, we’re savoring this flavorful and seasonal flatbread from Bon Appetit. Do justice by those final ripe tomatoes, the last of your crisp cucumbers, and that medley of aromatic garden herbs one last time before next Summer. 

INGREDIENTS

  • Flat bread, naan, or pocketless pitas (original recipe includes instructions, but you can use store bought, too!)

Tomatoes and Chickpeas

  • 2 garlic cloves, finely chopped

  • 1 teaspoon sumac (if unavailable, you can substitute lemon zest)

  • ½ teaspoon each of crushed red pepper flakes, ground coriander, and ground cumin

  • 1 teaspoon kosher salt

  • 2 large heirloom tomatoes, any color, thinly sliced

  • 1 15.5-ounce can chickpeas, rinsed

  • 2 tablespoons red wine vinegar

  • 1 small shallot, thinly sliced

  • ½ cup parsley leaves

  • 3 tablespoons olive oil

Yogurt Sauce

  • 1 Persian cucumber, peeled, chopped

  • ¾ cup plain yogurt

  • ½ cup each of coarsely chopped fresh mint and parsley

  • Hot sauce

RECIPE PREPARATION

Tomatoes and Chickpeas

  • Combine garlic, sumac, red pepper flakes, coriander, cumin, and 1 tsp. salt in a small bowl. Arrange tomato slices in a single layer on a rimmed baking sheet and sprinkle garlic mixture evenly over top. Let sit at room temperature at least 30 minutes and up to 1 hour.

  • Toss chickpeas and vinegar in a medium bowl; season with salt and pepper. Mash chickpeas with a fork until about half are smashed. Add shallot, parsley, and oil and toss to combine; season with salt and pepper. Set aside.

Yogurt Sauce

  • Combine cucumber, yogurt, mint, and parsley in a medium bowl; season with hot sauce, salt, and pepper. Let sit at room temperature at least 15 minutes.

Assemble

  • Top each flatbread with yogurt sauce, chickpea mixture, and tomatoes. Drizzle with more oil and season well with salt and pepper.


Seasonal Shifts

As much as we don’t want to say goodbye to Summer produce we are beginning to dream of spicy mustard greens, crisp cabbages, tender kohlrabi, and sweet, sweet beets. That’s right - just because Summer is ending doesn’t mean our supply of fresh produce needs to! There is so much to love about Fall produce. And an added bonus? Working in the garden in crisp Autumn air can’t be beat. 

Read more

Cilantro and coriander

A couple of months ago we wrote about bolted plants in the garden. When plants bolt they send up tall stems and flower, often changing the flavor of otherwise tasty leaves. This is a signal of the end of the plant’s season and is often triggered by hot conditions.

If you’ve left any brassicas or lettuces in your garden, you’ll likely have seen them bolt by now! But many herbs are also sensitive to the heat - basil, parsley, sage, and mint will all send out stalks of dainty, clustered flowers at some point during the Summer. But there is one particular herb that you should watch closely: Cilantro.

Coriander Seeds - Image from http://www.vegetablegardener.com

Coriander Seeds - Image from http://www.vegetablegardener.com

Cilantro is a unique herb insofar as it gives us two harvests! Throughout the Spring you can enjoy cilantro leaves on tacos, pad thai, in salads, and more. But if you leave the bolted cilantro flowers in your garden long enough they will produce seeds which you may know by the name of coriander. 

Coriander seeds are mainstays in Middle Eastern and Indian spice mixes like dukkah and garam masala, important ingredients in classic dill pickles, and are delicious flavor pairings with meats and citrus.

To harvest coriander seeds, wait until they have turned brown. You can either clip the whole stalks off, hanging them upside down within a paper bag. They’ll fall off and collect in the bottom of the bag when they’re all the way dry. Or allow the seeds to dry thoroughly on the plant and collect directly. Dried coriander can be stored in an air-tight glass jar.